Design & Craft · 12 min read
Wardrobe System and Dressing Room: Storage That Works Like Architecture
The morning begins with searching: the shirt is under the laundry basket, a wardrobe door sticks, boxes teeter on top. Now imagine a calm wall of fronts, one door opening onto exactly what you need, and a light that comes on as you reach. Let us call them the K. family: two adults, a teenager, an Altbau apartment (the pre-1945 Viennese apartment building) in the Wieden district with a room height of 3.40 metres. In the bedroom stand two wardrobes from different decades, a laundry basket between them, boxes on top. The wish is quickly put into words: a wardrobe system with a dressing room that looks as if it had always been there. Our counter-question is: how do you get dressed, when, and who needs how much space for it?
Contents
- What distinguishes a wardrobe system from a wardrobe
- Wardrobe system or joiner: the decision
- The dressing room: open, closed or both
- When a wardrobe works like architecture
- The Altbau sets the limits
- Light, power and air
- Planning a dressing room in Vienna: step by step
- What effort and duration depend on
- Frequently asked questions
- What happens next
What distinguishes a wardrobe system from a wardrobe
A wardrobe is a piece of furniture that stands in front of a wall. A wardrobe system is a structure that forms or replaces a wall. The difference sounds academic, but it changes the whole planning. Instead of thinking in pieces of furniture, you think in axes, heights and alignments.
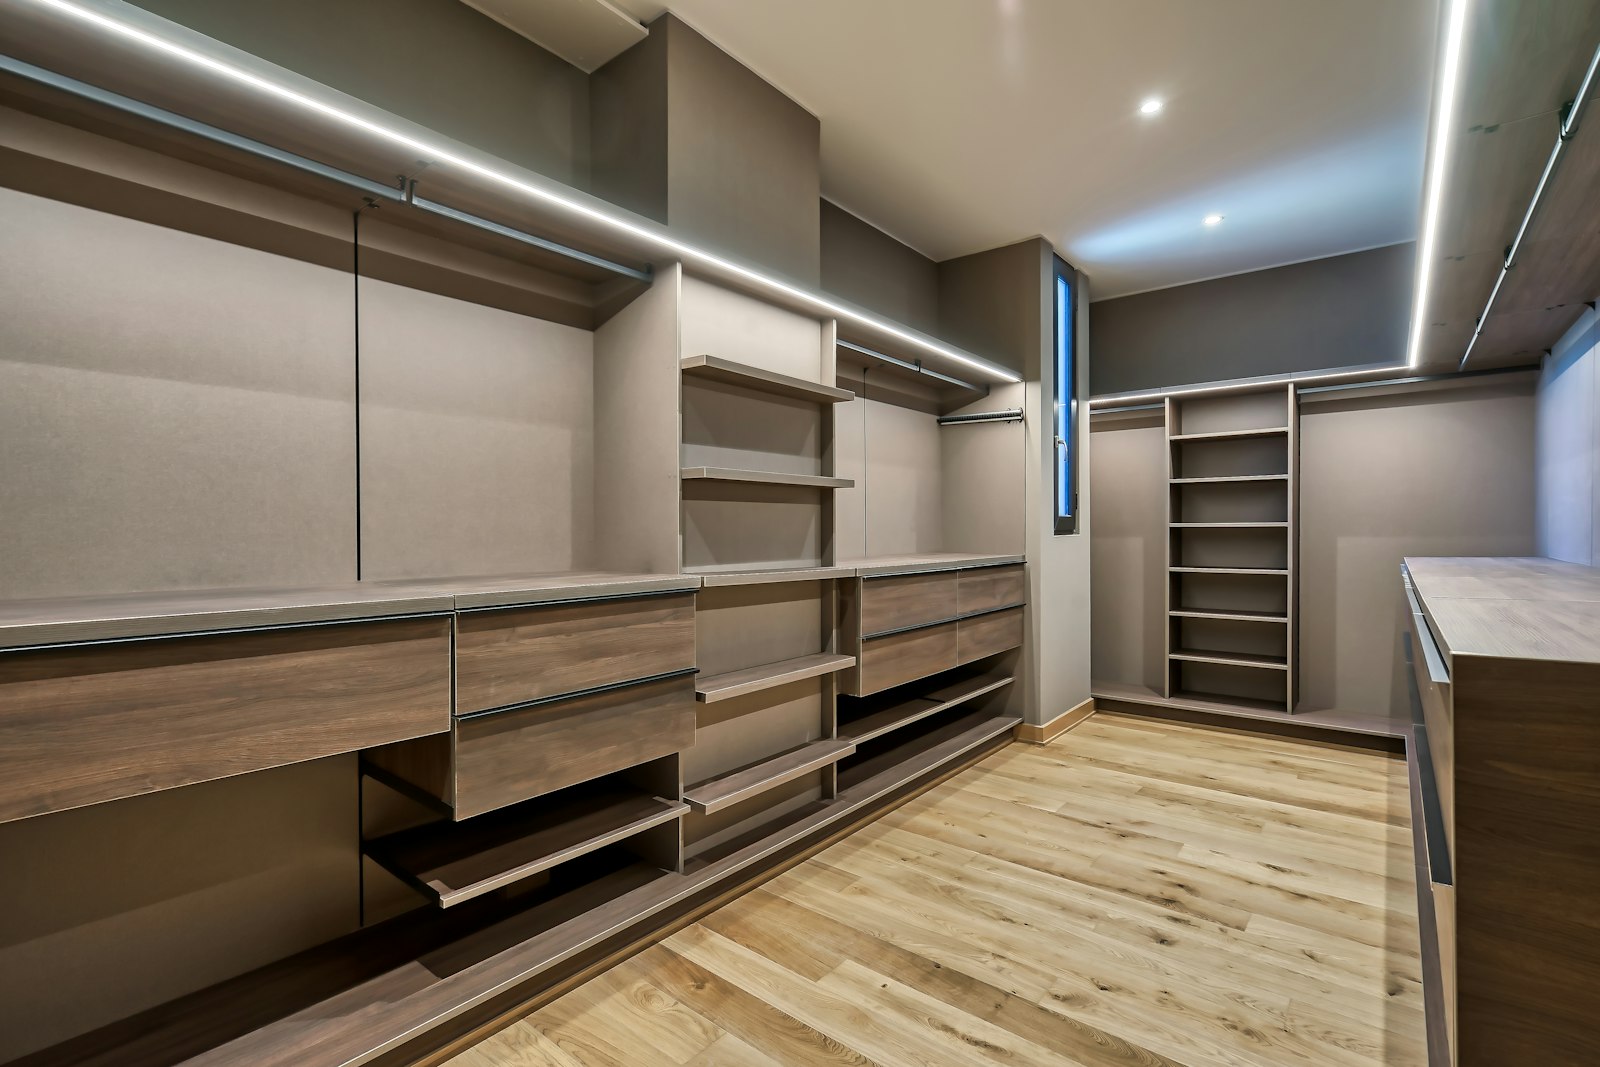
What is typical of a system is that carcass, fronts, interior fittings and lighting follow a common logic. Pull-outs, drawers with dividers, trouser racks and shoe shelves are matched to one another and proven in many projects. As a result the dressing room feels like a thought-out space and not like a collection of individual parts.
In return, the system brings a grid logic with it. Widths, heights and depths follow a modular kit. As long as the room cooperates, that is an advantage. It becomes difficult when a wall is several centimetres out of plumb, which is no rarity in a Viennese Altbau.
A good wardrobe does not disappear. It becomes the wall, and the wall becomes calmer than before.
Doing nothing has a price you pay every morning: the minutes of searching, the clothes you no longer wear because you cannot see them, the room that never feels finished because storage stands around it like luggage. A system chosen without the room costs in another way, in a gap at the top, a filler that does not match, an axis that comes out too wide. So which route, system or joiner?
Wardrobe system or joiner: the decision
The question "wardrobe system or joiner?" arises with almost every dressing room. There is no blanket answer, because both routes have strengths in different places. As a family of joiners we say this openly: a workshop can build almost anything, but rebuilding a mature interior in a one-off piece is rarely sensible.
| Criterion | Wardrobe system | Bespoke joinery |
|---|---|---|
| Interior fittings | mature and matched to each other | freely plannable, some details more laborious |
| Dimensions | in a grid, adaptable within limits | to the millimetre, from the survey |
| Altbau with crooked walls | needs filler pieces | planned in directly |
| Room heights above the standard | usually only with a top box or panel | continuous throughout |
| Fronts | defined range, often with fine profiles | free, also to match existing furniture |
| Later changes | inserts often easy to move | depending on the build |
In practice the best solution often lies in between: a system for the interior and the large straight surfaces, joinery at the edges. The basic question is dealt with at length in the article Bespoke built-in wardrobe or system wardrobe. You will find our own approach to made-to-measure solutions under built-in wardrobes. Before you decide, though, ask how you want the dressing room to be: open, closed or both?
The dressing room: open, closed or both
With the K. family it soon becomes clear that the two adults treat clothes very differently. He wants to see everything, she wants to see nothing. This tension is more common than you would think, and it decides the basic form of the dressing room.
- Open dressing room: It feels light and boutique-like and keeps everything in view. In return it demands order and a room of its own, and dust remains an issue.
- Closed wardrobe wall: It is calm and architectural and also fits in bedrooms and hallways. The swing of the doors or the sliding path must be planned in.
- Glass fronts: Clothes stay visible and yet protected. This calls for good interior lighting and some discipline behind the glass.
- Combination: Open zones for everyday things, closed ones for seasonal items. This is often the best answer for couples with different habits.
For our example a combination suggests itself: a closed wall in the bedroom for seasonal items and bed linen, and behind it, in the former small side room, a dressing room with glass fronts on his side and closed fronts on hers. Sleeping and dressing thereby become a sequence of rooms, as described in the article on the private zone of sleeping, dressing and bathing. Which areas and depths are needed for this is shown in the article planning a walk-in dressing room.
Imagine the bedroom in the evening light. The closed wall runs from window to door and up to the ceiling, with nothing on top and no gap at the side. Behind it the former side room glows softly, colours true under the light, shirts in a row on his side and a calm run of closed fronts on hers. What turns a wardrobe into architecture?
When a wardrobe works like architecture
A wardrobe becomes architecture when it takes its cue from the room and not from the catalogue. That has little to do with effort, but a lot to do with a few decisions that must be made early. They apply to a system just as much as to joinery.
- Think from wall to wall: A wardrobe wall looks calmest when it takes up the whole wall and finishes cleanly. A wardrobe that leaves a residual gap remains a piece of furniture.
- Take it up to the ceiling: A floor-to-ceiling finish looks built-in. The area above also collects no dust and no boxes.
- Order the axes: Joints and fronts should follow windows, doors and ceiling panels. Unequal front widths often become noticeable only when it is too late.
- Choose few materials: Wardrobe fronts should speak the language of floor and walls. The material concept provides the common thread.
- Tone down the handles: Finger recesses, push-to-open or a continuous handle profile keep the surface calm. Try beforehand whether that suits you in daily use.
With timber fronts, the question of material also arises. For large, flat surfaces a well-made veneer is often the more stable choice, because it warps less, as the article Veneer or solid wood explains. Matt lacquers look calm but show fingerprints to different degrees depending on the shade. Yet every system has edges, and in an Altbau there are three.
The Altbau sets the limits
Every system has edges. These are the places where the room does not follow the grid. In a Viennese Altbau there are usually three: the room height, the wall geometry and the junctions.
The room height
3.40 metres is both a gift and a problem. Hardly any system is designed for this height, and nobody wants to fetch clothes from right at the top every day anyway. A common solution: the system ends at a comfortably reachable height, and above it a top cabinet or a panel from the joinery connects. This creates a floor-to-ceiling wall with no visible gap to the ceiling.
The wall geometry
Crooked walls, stucco mouldings, window reveals and radiators call for filler pieces. These are made from the survey by the joinery workshop Tischlerkultur, family-run since 1935, while the system can stay within its grid. To the eye, it is in the end not visible where one stops and the other begins, provided material and joint pattern are cleanly matched. Stucco and ceiling profiles should be respected and not simply cut off.
The junctions
A wardrobe wall that frames a window or integrates a door needs a clean finish. If the transition to the dressing room is closed not with a hinged door but with a sliding solution, wardrobe and door should be thought of as one surface. What matters here is described in the article on sliding doors and glass systems. Behind the fronts, light, power and air do quiet work.
Light, power and air
A dressing room without good light is a dark corridor with clothes. The light should show colours unaltered, so that black and navy can be told apart. Look for high colour rendering and a warm to neutral light colour that suits the rest of the concept. How this works in context is described in the article on lighting design for the apartment.
Light needs power, and power needs planning. Motion sensors or door contacts, drivers, a socket for the garment steamer: all of this must be settled before the walls are finished. Otherwise only visible cables or compromises remain. More on this is in the article on electrical planning.
Less well known is ventilation. A closed wardrobe wall on a cool exterior wall can become a moisture trap, especially in unrenovated Altbau buildings. In such cases the wall should be checked in advance and a gap for rear ventilation planned in. Whether further measures are needed, we clarify with the relevant specialists. How does it all come together, step by step?
Clothes need light to be seen and air so as not to suffer.
Planning a dressing room in Vienna: step by step
Anyone who wants to plan a dressing room in Vienna often has to deal with an Altbau in which hardly a dimension matches the old plan. The sequence is slightly different in every project but follows a clear pattern. For the K. family it could look like this:
- Record habits. How many shirts hang, how many lie flat? Where do the shoes end up? What is seasonal? From this you get how much rail length and how many drawers are really needed.
- Take the survey. Walls, plumb, ceilings, stucco, windows, radiators, sockets. In an Altbau, measurements are taken at several heights, because walls are rarely parallel.
- Define zones. Everyday things at grip height, seasonal items up high, heavy items down low, and separate areas for two people if that is wanted.
- Divide system and joinery. What comes from the grid, what is made to measure? This boundary belongs in the design and not on the building site.
- Check dimensions. For clothes on hangers, a depth of about 55 to 60 centimetres is usual; for folded laundry, 35 to 45 centimetres is often enough. The aisle needs at least about 80 centimetres, and for dressing rather 100 to 120.
- Match material and fronts. Veneer, lacquer, glass, metal. The fronts must suit the rest of the material concept, not just each other.
- Plan light and electrics. Positions, switching, drivers and accessibility for later maintenance.
- Sample and sign off. Samples in the real room, in daylight and artificial light.
- Manufacture and install. System parts and joinery parts are scheduled so that installation succeeds in one go.
The fourth step is the decisive one. Anyone who skips it discovers only at installation that the last axis is a few centimetres too wide. At Richard Atelier one person holds these threads, from the survey to installation.
What effort and duration depend on
A serious range can be given only once survey, zones and specification are settled. Blanket figures tend to mislead, because they rarely take interior fittings, lighting and adaptation into account. The effort depends mainly on four things: the length of the wardrobe wall, the fronts, the interior fittings and the share of bespoke work.
Cutting back on the interior fittings is usually the wrong place, because that is where comfort in daily life is decided. On the number of glass fronts or special functions, by contrast, little is lost. Here too a look at the whole floor plan helps: how storage is distributed across the apartment is shown by the storage concept for the whole apartment.
As for time, depending on the specification you should allow for several weeks of lead time, in some cases more. The installation itself takes a few days for a typical dressing room. If the wardrobe wall is part of a larger conversion, it should be placed in the schedule so that painters and electricians have finished beforehand. If you would like an honest range for your own wardrobe wall, the first conversation is free: 30 minutes, by phone or video, without obligation.
For the K. family, the morning after would be short. A soft light comes on as the door glides open, he sees his shirts at a glance, she sees a calm wall, and the teenager inherits the old wardrobes. Nothing is searched for, and nothing stands around.
Frequently asked questions
What is a wardrobe system?
A wardrobe system is a modular assembly of carcass, fronts and interior fittings, often complemented by integrated lighting. It follows a fixed grid and can be put together into whole wardrobe walls or walk-in dressing rooms. Unlike a wardrobe, it feels more like part of the room than like a piece of furniture, which is what makes a bedroom calmer.
Wardrobe system or joiner: which is better?
That depends on the room. A system plays to its strengths with straight walls and a mature interior. The joinery is superior when walls are crooked, ceilings high or niches unusual. Often the combination of the two is the best solution, and we say plainly which one your room needs.
Does a wardrobe system suit a Viennese Altbau?
Yes, usually with additions. High ceilings, crooked walls and stucco call for filler pieces, panels or top cabinets made to measure. The boundary between system and joinery should be fixed already in the design, so that nothing is improvised on the building site.
From what size is a walk-in dressing room worthwhile?
As a rule of thumb, a single-run dressing room works from about 3 to 4 square metres, and a U-shape for two people from about 5 to 6 square metres. What matters is a wardrobe depth of about 60 centimetres for hanging clothes and an aisle width of at least about 80 centimetres. The space is worthwhile above all when it makes the bedroom noticeably calmer. We check this against your floor plan.
How long does it take from planning to a finished dressing room?
That depends on the specification, lead times and the amount of bespoke work. For system components you should allow several weeks, and the installation itself usually takes only a few days. If the dressing room is part of a larger conversion, it follows the overall schedule. We name the dates early so that you can plan around them.
Does a dressing room need its own lighting?
Yes, practically always. Light directly on the fronts or in the carcass shows colours unaltered and makes even deep compartments legible. The cables should be planned in before the walls are finished. Good light makes the whole wardrobe feel finished.